Showing posts with label recipe. Show all posts

Tuesday, July 16, 2013

Grilled Stuffed Chicken Filets: RECIPE

Grilled stuffed chicken filets topped with a savory Burgundy-tomato sauce.
Yum - so good!

Great recipes can develop any time, anywhere; sometimes inspiration hits in the grocery store, sometimes in front of the pantry. Sometimes inspiration comes from someone else's recipe, as this one did.

I just adore Rachael Ray - she is a joy to watch on TV and her recipes are amazing. A short while ago she demonstrated a recipe for Mediterranean Chicken

The recipe is fantastic, but my bunch craves a little more country in the cock-a-doodle-doo, so I have adapted Rachael Ray's recipe...and taken it to the grill!

INGREDIENTS
2 cups shredded cheese, Cheddar & Monterey Jack blended
1 pound bacon, uncooked, cut into 1" squares
1 small onion, chopped
2 cloves garlic, minced
2 small pickled jalapeno peppers, finely chopped
6 boneless, skinless chicken breasts
Salt and pepper
2 tablespoons extra virgin olive oil
1/2 cup Burgundy wine
1 can fire roasted diced tomatoes (14.5 ounces)
1/2 cup chicken broth
4 cups prepared pasta or rice

DIRECTIONS
Fire up the grill!

Combine the cheese, bacon, onion, garlic and jalapeno pepper. Butterfly the chicken breasts (slit horizontally). Pound the chicken flat with a mallet; season with salt and pepper. Place cheese/bacon mixture into center of each chicken breast filet. Fold the chicken together, top over bottom, and secure open edges with round toothpicks.


In a large, heavy skillet, heat the olive oil over medium-high heat. Add the chicken and cook until browned, 3-4 minutes per side. Transfer the chicken to the hot (350°F) grill; cook completely, 15-20 minutes, with the grill covered.

As the chicken is cooking, pour the wine into the skillet and simmer for 5 minutes, stirring to release the browned bits. Stir in the tomatoes and chicken broth. Reduce heat to low, cover skillet and continue to simmer for 10 minutes.

Slice cooked chicken crosswise, serve over prepared pasta or rice, top with the Burgundy-tomato sauce.

As written, this is quite a spicy dish; if you prefer less heat, reduce the amount of jalapenos.

Where does your kitchen inspiration originate?

As always, I look forward to your questions and comments!

~Until next time!

Sunday, July 14, 2013

Fire Roasted Whisky Pecans: RECIPE

Fire up the grill, grab your cast iron skillet and get excited because I've got a new recipe for you - Fire Roasted Whisky Pecans!

Last week I hinted that I've been working on a Grown Up version of the Fire Roasted Candied Pecans and, after a couple of attempts, I have it for you.  

For the Fire Roasted Whisky Pecans I used a 11 1/4" cast iron skillet on the grill over a charcoal fire with whisky-soaked apple wood chunks for great, smokey flavor.

INGREDIENTS
2 Tablespoons unsalted butter
2 cups pecans
1/2 cup granulated (white) sugar
1/2 cup dark brown sugar
1/3 cup Honey Whisky
1 Tablespoon vanilla extract
1/4 teaspoon cinnamon

DIRECTIONS
Generously butter bottom and sides of cast iron skillet.
Combine sugars, whisky, vanilla and cinnamon in a 1.5 qt mixing bowl; mix well with a wooden spoon. Add nuts to mixture, stirring and folding to fully coat the pecans. (Other nuts could be used in this recipe but pecans have those little pockets built in - perfect for holding in delectable flavors!) Spread contents evenly into the buttered skillet.
A side rack on the grill is perfect, if you have one, as indirect heat roasts the nuts without burning the sugar. Slow roasting is the key to great flavor! Roast through the syrupy stage and until syrup crystalizes, stirring occasionally.
The temperature on my charcoal grill read 350° and I roasted the pecans for 35 minutes with the lid closed.

Be sure to use a well padded mitt during this process as the cast iron is heavy and will be extremely hot!

Allow pecans to cool for 10 minutes before turning them out onto parchment paper to cool completely.

There are no adjectives sufficient to describe the taste of these Fire Roasted Whisky Pecans. The honey whisky lends a subtle, malty flavor that is rounded out by the brown sugar - distinct but not overwhelming. The vanilla and cinnamon add delicate undertones to these mouth-watering treats. These are going to be amazing sprinkled on a dish of hand-cranked vanilla ice cream!

Fire Roasted Whisky Pecans are easy to make, delicious, and they make a lovely gift. Here they are packaged in a Cowgirl Cocktail, just one of the Not Your Typical Redneck Wine Glasses, available in my Etsy shop.


Give this recipe a try and let me know what you think! Your comments are always appreciated.

Cheers!

Sunday, June 30, 2013

Fire-Roasted Candied Pecans: RECIPE


Like most good southern cooks, I have a recipe for Candied Pecans filed away under Holiday Baking. But it's summertime in The South and heating the house with the oven is the last thing I want to do!   

My sweet tooth is craving those crunchy treats though, and I'm not willing to shell out the bug bucks at the mall so... To the grill I go!   

We fire up the charcoal grill at least five times a week in the summer, and I typically add wet *Applewood Chunks for delectable, smokey flavor. Today's menu includes deer sausage, home grown steak, garlic baked potatoes, and...


Fire-Roasted Candied Pecans!


*TIP!! When soaking wood chunks use just enough liquid to cover them. Wood soaked in a mix of half water/half honey whiskey gives an amazing flavor to food!  


I had intended to trial-run this recipe with pecans but most of my supply has disappeared (into the mouths of babes?) so today I used a combination of 1-1/2 cups pecans and 1/2 cup walnuts. I imagine almonds would be delicous as well.

INGREDIENTS
2 cups pecans
1/2 cup granulated (white) sugar
1/4 cup dark brown sugar
1/3 cup water
1 Tablespoon vanilla extract
1/4 teaspoon cinnamon

DIRECTIONS
Combine all ingredients in a one-gallon ziploc bag, shake well to fully coat the nuts. Spray a sheet of foil with nonstick spray and secure it on grill rack. An upper rack is perfect if you have one as indirect heat roasts the nuts without burning the sugar. Slow roasting is the key to great flavor!
Spread coated pecans in an even layer on the foil. Roast through the syrupy stage and until syrup crystalizes, stirring occasionally.
I was cooking on an open grill for about 45 minutes then I allowed the nuts to cook an additional 45 minutes with the grill closed, for a total of 90 minutes. Had I kept the grill closed for the entire process the nuts probably would have been finished in 45 minutes or less.

Results? Out of this world! Reminds me of Aunt Ruby's Pecan Pie. They are sweet - but not too sweet - and crunchy; mellow  with cinnamon and vanilla and those sultry,  smokey undertones...

These Fire Roasted Candied Pecans would be delightful on oatmeal, ice cream or cinnamon rolls - but I don't think this batch will last that long.   Maybe next time...in fact, I have an idea for a Grown Up version...

But that will be another post~
See you then!

Friday, June 28, 2013

Mowing the Lawn with Coconut Oil

Today's forecast for Lower Alabama: 92° with a slight chance of rain. PERFECT! These are ideal conditions for Mowing the Lawn with Coconut Oil!

You have probably read all about the benefits of coconut oil - if not, there is an interesting article HERE.

But mowing the lawn with it? That's absurd! Unless you've got all the details.

As I mentioned in PIN REVIEW: Homemade Moisturizing Lotion, I use a lot of coconut oil. It is a great moisturizer for skin and hair because it is one of the few oils that penetrates rather than just coating. It effectively removes makeup and moisturizes the delicate under-eye area. I massage it into my puppy's hide, he has very dry skin, because it hydrates his skin and it's lick-safe. I even have a friend who uses coconut oil in place of butter in her cooking (bless her heart!)

But this post is Mowing the Lawn with Coconut Oil! What's that about?

It's really about a coconut oil health food mask that leaves dry, brittle hair in amazing condition! The mask is a simple pre-wash treatment that only requires 3 items: coconut oil, a plastic shower cap, and a heat source.

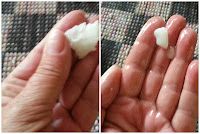
To use this miracle treatment, start with a big dollop of coconut oil - my hair is thick and curly so I require an extra large serving. The oil is going to be solid at first but the heat from your hands will melt it.

Start at the roots and begin working the oil through your hair. I put some effort in at the roots as scalp massage is supposed to stimulate growth! Saturate your hair, working the oil in with your fingers and directing it toward the ends and any area prone to dryness. When your hair is completely soaked, cover it with the plastic shower cap; if you have long hair, you may want to twist it up on top of your head first. So now your hair is ready but your hands are slick with coconut oil! Take it to your skin, your knees and elbows will thank you!

Applying heat to the hair mask is not absolutely necessary but it does seem to open the hair cuticle, allowing for even better absorption of the coconut oil. Without heat, I typically marinate my hair for at least two hours - with heat, at least an hour. I have been known to run around all day painted up in coconut oil!

If you choose the heat method you have several options including the blow dryer or a hot towel. My preference is natural heat - and THAT is where the lawn mower comes in!

Cutting grass at 92° burns calories, loads me up with Vitamin D, sweats the pores, provides the cows a tasty green snack, and generates the heat to help hair soak up the benefits of coconut oil! Before I crank up Ol' Blue, I also slather my skin with coconut oil. Coconut oil has an SPF somewhere between four and ten and, mixed with a few drops of peppermint oil, it is an effective (and safer than deet) insect repellent.

Ol' Blue
When your time is up, and before shampooing, rinse hair with cool water to help close the cuticle and seal in all of that good coconutrition (I totally just made up that word!). Then shampoo, focusing on roots, and condition as you normally would. You should see a difference after only one application but your hair will continue to improve with repeated use. This coconut oil hair mask can be used every time you mow the lawn or as often as you like - I have found that a once a week treatment leaves my naturally curly hair soft, silky and nearly frizz free.


Have you gone nuts over coconut? I would love to hear how you are using coconut oil - your comments are always welcome!

Thursday, June 20, 2013

PIN REVIEW: Homemade Moisturizing Lotion


Ahhh...PINTEREST, that delightful online corkboard for organizing and displaying pictures of the things that inspire us, has quickly become one of the hottest social media sites around. Users can upload, save and sort images (pins), follow other users and repin from their boards or directly from the internet. Categories include Food & Drink, Travel, Gardening, Education, and my favorite: DIY & Crafts.

But does that DIY stuff really work? Do the recipes turn out like the pictures suggest? I decided to do a test...

One of the recurring pin themes I've noticed on PINTEREST is homemade body lotion recipes. As an avid do-it-yourselfer and moisturizer hoarder collector, these pins got my attention! Today I have recreated one of the more common recipes so let's take a look at the ingredients, the process and the results!

While there was quite a selection to choose from, I elected to follow this guideline:
1 part Vitamin E Cream
1 part solid coconut oil
2 parts baby lotion


The process couldn't be much simpler: place the ingredients in a bowl and whip with a mixer until the mixture resembles fluffy, pink cake frosting. Store in airtight container (read: Mason Jar! )

Before we check out the results, let's take a look at the 'science' behind this recipe.

Vitamin E
According to THIS NBC news article, Vitamin E, applied topically, eases dryness by helping skin retain its natural moisture. It may neutralize damaging free radicals and reduce the unstable molecules present after exposure to cigarette smoke. For my lotion I used 4 oz of Vitamin E SkinCare Cream.

Coconut Oil
The benefits of coconut oil are being touted worldwide! An ARTICLE in the Farmer's Almanac  explains that coconut oil is rich in lauric acid, capric acid and caprylic acid, which makes it beneficial as an antimicrobial, antioxidant, antifungal, and antibacterial. As a moisturizer, coconut oil speeds healing of flaking, cracked skin, prevents wrinkles, and helps in the treatment of eczema, psoriasis, and other chronic conditions. Coconut oil is a solid that quickly becomes liquid when subject to heat, and returns to a solid when cooled. I have used coconut oil as a moisturizer for skin and hair and I love it! For today's experiment I used 4 oz of pure coconut oil.

Baby Lotion
Baby lotion smells really good (that's personal opinion, not necessarily science)! I haven't done research on the individual components of baby lotion, but in my experience this mild lotion is appropriate for delicate skin. It absorbs quickly and hydrates well. The creamy formula helps stabilize the coconut oil in this recipe. I have used 8 oz of pink baby lotion in this trial.  

So what about the results? Is this Homemade Moisturizing Lotion that's popping up all over PINTEREST really worth the effort?

On a 1-10 scale I rate it a 10!

Finding the ingredients: 10!
All of the ingredients were readily available in my local super center.

Cost of ingredients: 10!
Supplies to make 3 1-pint batches cost less than $14 and I had both coconut oil and baby lotion left over.

Preparation/process: 10!
Total time including measuring, mixing & packaging was 9 minutes, 13 seconds!  I can live with that!

The finished product: 10!
Because the 16 oz of ingredients are whipped, there was enough finished product to fill a pint mason jar - and plenty left over to slather on! The lotion is thick, rich and creamy but goes on light as air. The skin is moist, with a soft sheen, but doesn't feel greasy. And the scent is delightful! I used the pink baby lotion this time around but I am sure I will try the others eventually.

Homemade Moisturizing Lotion Rates A 10! 
This PIN is a WIN!   


Have you made this lotion? Tweaked the recipe? I would love to read your comments and suggestions!


Tuesday, May 21, 2013

GRitS & Sun Tea


 My Mama knew all about GRitS - after all, she was one! And she knew all about Sun Tea, and she made the best there was!

When I say GRitS, I'm not referring to that buttery, delicious dish served with fried eggs or catfish (although Mama knew all about those too) I'm referring to GRitS - Girls Raised in the South. Mama was one, and even though we really weren't, growing up in Idaho, she raised her little girls up just like we were GRitS too.

We had chores and we did them, and we liked them whether we liked them or not. Spring cleaning happened every Saturday. Cooking supper wasn't something you did - it was something you did right. And the best way to make tea was to put it in an old wide-mouthed gallon pickle jug and set it in the sun on a warm, bright morning.

I remember carrying that jug outside, full to the top with cold well water and paper tea bags, and running off to play with my Sissy. Ever so often one of us would go back and check the jug - still clear - golden yellow - rich amber - and finally, after an eternity of waiting, the Sun Tea was ready to take inside. With all the patience of a fox on a coon hunt, Sissy & I would wait while Mama fished out the tea bags, squeezing each one, but not hard enough to pop them open, and stirred in just the right amount of sugar with her long-handled wooden spoon.

Mmmm...just thinking about it makes me thirsty for an ice cold jar!

Yes Ma'am... GRitS and Sun Tea are at the center of some of my best childhood memories. Now where did I put that old pickle jug?

MAMA'S SUN TEA RECIPE

6 Regular Tea Bags
Water
A Glass Gallon Jug with Lid
About 1 Cup of Sugar
A Sunny Day
Ice

Fill jug to about one inch from the top with fresh water. Drop in tea bags; cover. The best tea is made in the morning and steeps in the sun for about 4 hours. Properly served over ice and in a mason jar. Quilted Gingham Jar Coozie available in my Etsy shop!